
폰트 출력과 최적화에 대해 살펴보자.
Frustum기법 을 사용하면 간단하게 최적화를 구현할 수 있다.
먼저. 카메라의 각 면에대해 해당 객체가 면의 안쪽에 위치하는지를 체크한다.
void Camera::Frustum()
{
	Float4x4 VP;
	XMStoreFloat4x4(&VP, view * projection); // 월드상의 절도체 정보

	// Left
	a = VP._14 + VP._11;
	b = VP._24 + VP._21;
	c = VP._34 + VP._31;
	d = VP._44 + VP._41;

	planes[0] = XMVectorSet(a, b, c, d);

	// Right
	a = VP._14 - VP._11;
	b = VP._24 - VP._21;
	c = VP._34 - VP._31;
	d = VP._44 - VP._41;

	planes[1] = XMVectorSet(a, b, c, d);

	// Bottom
	a = VP._14 + VP._12;
	b = VP._24 + VP._22;
	c = VP._34 + VP._32;
	d = VP._44 + VP._42;

	planes[2] = XMVectorSet(a, b, c, d);

	// TOP
	a = VP._14 - VP._12;
	b = VP._24 - VP._22;
	c = VP._34 - VP._32;
	d = VP._44 - VP._42;

	planes[3] = XMVectorSet(a, b, c, d);

	// Near
	a = VP._14 + VP._13;
	b = VP._24 + VP._23;
	c = VP._34 + VP._33;
	d = VP._44 + VP._43;

	planes[4] = XMVectorSet(a, b, c, d);

	// Far
	a = VP._14 - VP._13;
	b = VP._24 - VP._23;
	c = VP._34 - VP._33;
	d = VP._44 - VP._43;

	planes[5] = XMVectorSet(a, b, c, d);

	FOR(6)
		planes[i] = XMPlaneNormalize(planes[i]);
}
카메라의 뷰포트 면을 구하는 함수이다.
각 면은 어차피 노멀라이즈해서 사용함으로, 정규화 시켜 사용한다.
위의 각 함수는 view -> projection까지 진행한. 월드배치 카메라의 면값이다.
이 값들을 사용해서 단순무식하게 값을 검증해보자.
bool Camera::ContainSphere(Vector3 center, float radius)
{
	Vector3 edge;
	Vector3 dot;

	FOR(6)
	{
		//1
		edge.x = center.x - radius;
		edge.y = center.y - radius;
		edge.z = center.z - radius;
		dot = XMPlaneDotCoord(planes[i], edge);
		if (dot.x > 0.0f)
			continue;

		//2
		edge.x = center.x + radius;
		edge.y = center.y - radius;
		edge.z = center.z - radius;
		dot = XMPlaneDotCoord(planes[i], edge);
		if (dot.x > 0.0f)
			continue;

		//3
		edge.x = center.x - radius;
		edge.y = center.y + radius;
		edge.z = center.z - radius;
		dot = XMPlaneDotCoord(planes[i], edge);
		if (dot.x > 0.0f)
			continue;

		//4
		edge.x = center.x - radius;
		edge.y = center.y - radius;
		edge.z = center.z + radius;
		dot = XMPlaneDotCoord(planes[i], edge);
		if (dot.x > 0.0f)
			continue;

		//5
		edge.x = center.x + radius;
		edge.y = center.y + radius;
		edge.z = center.z - radius;
		dot = XMPlaneDotCoord(planes[i], edge);
		if (dot.x > 0.0f)
			continue;

		//6
		edge.x = center.x + radius;
		edge.y = center.y - radius;
		edge.z = center.z + radius;
		dot = XMPlaneDotCoord(planes[i], edge);
		if (dot.x > 0.0f)
			continue;

		//7
		edge.x = center.x - radius;
		edge.y = center.y + radius;
		edge.z = center.z + radius;
		dot = XMPlaneDotCoord(planes[i], edge);
		if (dot.x > 0.0f)
			continue;

		//8
		edge.x = center.x + radius;
		edge.y = center.y + radius;
		edge.z = center.z + radius;
		dot = XMPlaneDotCoord(planes[i], edge);
		if (dot.x > 0.0f)
			continue;

		return false;
	}

	return true;
}
그냥 모든 면에대해 객체가 구체라고 가정하였을 때. 해당 구체가 외곽선의 xyz값에 닿는지 안닿는지 확인하는 함수이다.
면은 항상 모든방위인 8면에 대해 검증한다.
각 검증값이 해당되지 않을경우, false를 반환하고 한개라도 닿았거나 내부일경우 렌더해야함으로. true를 반환한다.
평면방정식 상. 법선과 해당객체의 방향cos를 구할 수 있다.
방향 cos를 구했으면 쉽다. 우리는 객체의 충돌을 구하는것 이 아니라
객체가 카메라 내에 있는지 아닌지만 판별하면 되기 때문에 그냥 return쳐버리면 된다.
위와같이 FPS차이가 발생하는걸 볼 수 있다.
Font삽입하기
Text를 삽입하기 위해서는 먼저 사전준비를 해야한다.
#pragma once

class Font : public Singleton<Font>
{
public:
    Font();
    ~Font();

    // 텍스트의 색상을 추가하는 메서드. 쉐이더처럼 사용됩니다.
    void AddColor(string key, float r, float g, float b);

    // 텍스트 스타일을 추가하는 메서드. 기본값 설정 가능.
    void AddStyle(string key, wstring font, float size = 20.0f,
        DWRITE_FONT_WEIGHT weight = DWRITE_FONT_WEIGHT_NORMAL, // 사이즈
        DWRITE_FONT_STYLE style = DWRITE_FONT_STYLE_NORMAL,// 폰트 기울이기등
        DWRITE_FONT_STRETCH stretch = DWRITE_FONT_STRETCH_NORMAL); // 밑줄 가운뎃줄

    // 지정된 키에 해당하는 색상을 설정합니다.
    void SetColor(string key);

    // 지정된 키에 해당하는 스타일을 설정합니다.
    void SetStyle(string key);

    // 텍스트를 렌더링하는 메서드. 위치와 크기 지정 가능.
    void RenderText(wstring text, Float2 pos, Float2 size = Float2());
    void RenderText(string text, Float2 pos, Float2 size = Float2());

    // 현재의 디바이스 컨텍스트를 반환합니다.
    ID2D1DeviceContext* GetDC() { return context; }

    // ANSI 문자열을 wide 문자열로 변환하는 메서드
    wstring ChangeWString(string value);

private:
    ID2D1Factory1* factory;  // Direct2D 팩토리
    // DIrectX2D API를 사용하기위한 변수. 객체생성과 초기화하는데 사용한다.

    IDWriteFactory* writeFactory;  // DirectWrite 팩토리
    // 텍스트를 렌더링하고 글꼴과 관련된 작업을 수행함.

    ID2D1Device* device;  // Direct2D 디바이스
    ID2D1DeviceContext* context;  // Direct2D 디바이스 컨텍스트

    ID2D1Bitmap1* targetBitmap;  // 렌더 타겟 비트맵
    // 그래픽 또는 텍스트를 그릴 대상이되는 이미지를 저장함

    map<string, ID2D1SolidColorBrush*> brushes;  // 색상 브러시 맵
    map<string, IDWriteTextFormat*> formats;  // 텍스트 포맷 맵

    ID2D1SolidColorBrush* curBrush;  // 현재 사용 중인 브러시
    // ID2D1SolidColorBrush = 특정 단색으로 채워진 도형을 그릴 때 사용함.
    IDWriteTextFormat* curFormat;  // 현재 사용 중인 텍스트 포맷
    // IDWriteTextFormat = 텍스트의 모양, 스타일, 정렬 등을 지정할 수 있음.
};
각 텍스트를 출력하기위한 변수와 함수이다.
Fontclass에서는 Device와 DeviceContext를 따로 가지며,
Device는 원래 사용하던 CPU를 받아오고,
DeviceContext는 받아온 Device설정을 다르게 하여 새로 생성하고 버퍼를 전달한다.
2D출력용 버퍼 설정을 해야하기 때문에, 원래 사용하는 DeviceContext와는 다른 설정을 유지해야 한다.
#include "Framework.h"

Font::Font()
{
	// 폰트 관련 작업을 처리하기 위한 DirectWrite 팩토리 생성
	DWriteCreateFactory(DWRITE_FACTORY_TYPE_SHARED, __uuidof(IDWriteFactory), (IUnknown**)&writeFactory);

	// 그래픽 렌더링을 위한 Direct2D 팩토리 생성
	D2D1CreateFactory(D2D1_FACTORY_TYPE_MULTI_THREADED, &factory);

	// 응용 프로그램의 디바이스로부터 DXGI 디바이스 획득
	IDXGIDevice* dxgiDevice;
	DEVICE->QueryInterface(&dxgiDevice);
	//디바이스를 쓰기위해 받아옴.

	// DXGI 디바이스를 사용하여 Direct2D 디바이스 생성
	factory->CreateDevice(dxgiDevice, &device);

	// Direct2D 디바이스 컨텍스트 생성
	device->CreateDeviceContext(D2D1_DEVICE_CONTEXT_OPTIONS_ENABLE_MULTITHREADED_OPTIMIZATIONS, &context);

	// 스왑 체인에서 DXGI 서피스 획득
	IDXGISurface* dxgiSurface;
	Device::Get()->GetSwapChain()->GetBuffer(0, __uuidof(IDXGISurface), (void**)&dxgiSurface);

	// 비트맵 속성 설정
	D2D1_BITMAP_PROPERTIES1 bp;
	bp.pixelFormat.format = DXGI_FORMAT_R8G8B8A8_UNORM;
	bp.pixelFormat.alphaMode = D2D1_ALPHA_MODE_IGNORE;
	bp.dpiX = 96;
	bp.dpiY = 96;
	bp.bitmapOptions = D2D1_BITMAP_OPTIONS_TARGET | D2D1_BITMAP_OPTIONS_CANNOT_DRAW;
	bp.colorContext = nullptr;

	// DXGI 서피스로부터 Direct2D 비트맵 생성
	context->CreateBitmapFromDxgiSurface(dxgiSurface, &bp, &targetBitmap);

	// 렌더링 대상을 설정
	context->SetTarget(targetBitmap);
}

Font::~Font()
{
	// 컬러
	for (pair<string, ID2D1SolidColorBrush*> brush : brushes)
		brush.second->Release();

	// 폰트
	for (pair<string, IDWriteTextFormat*> format : formats)
		format.second->Release();

	factory->Release();
	writeFactory->Release();
	targetBitmap->Release();
	context->Release();
	device->Release();
}

void Font::AddColor(string key, float r, float g, float b)
{
	// 키(key)에 해당하는 브러시가 이미 존재하면 중복 생성을 피하기 위해 체크
	if (brushes.count(key) > 0) return;

	// D2D1::ColorF를 사용하여 RGB 값을 통해 ColorF 객체를 생성
	D2D1::ColorF colorF(r, g, b);

	// Solid Color 브러시를 생성하여 colorF로 색상을 설정
	ID2D1SolidColorBrush* brush = nullptr;
	context->CreateSolidColorBrush(colorF, &brush);

	// 생성된 브러시를 brushes 맵에 추가
	brushes[key] = brush;
}

void Font::AddStyle(string key, wstring font, float size, DWRITE_FONT_WEIGHT weight, DWRITE_FONT_STYLE style, DWRITE_FONT_STRETCH stretch)
{
	// 키(key)에 해당하는 포맷이 이미 존재하면 중복 생성을 피하기 위해 체크
	if (formats.count(key) > 0) return;

	// IDWriteTextFormat 포맷을 생성
	IDWriteTextFormat* format;

	// CreateTextFormat 메서드를 사용하여 텍스트 포맷을 생성하고 초기화
	writeFactory->CreateTextFormat(font.c_str(), nullptr, weight, style, stretch, size, L"ko", &format);

	// 생성된 포맷을 formats 맵에 추가
	formats[key] = format;
}

void Font::SetColor(string key)
{
	if (brushes.count(key) == 0) return;

	curBrush = brushes[key];
}

void Font::SetStyle(string key)
{
	if (formats.count(key) == 0) return;

	curFormat = formats[key];
}

void Font::RenderText(wstring text, Float2 pos, Float2 size)
{
	// 만약 크기가 0인 경우, 텍스트의 길이와 현재 포맷의 폰트 크기를 곱하여 크기를 설정
	if (size.x == 0.0f && size.y == 0.0f)
	{
		size.x = text.size() * curFormat->GetFontSize();
		size.y = curFormat->GetFontSize();
	}

	// 크기의 반을 계산하여 halfSize에 저장
	Float2 halfSize = { size.x * 0.5f, size.y * 0.5f };

	// Y 좌표를 윈도우 높이에서 빼서 좌표 공간을 조정
	pos.y = WIN_HEIGHT - pos.y;

	// D2D1_RECT_F 구조체를 사용하여 텍스트를 그릴 영역을 정의
	D2D1_RECT_F rectF;
	rectF.left = pos.x - halfSize.x;
	rectF.right = pos.x + halfSize.x;
	rectF.top = pos.y - halfSize.y;
	rectF.bottom = pos.y + halfSize.y;

	// 설정된 영역에 텍스트를 그림
	context->DrawTextW(text.c_str(), text.size(), curFormat, &rectF, curBrush);
}

void Font::RenderText(string text, Float2 pos, Float2 size)
{
	// 만약 크기가 0인 경우, 텍스트의 길이와 현재 포맷의 폰트 크기를 곱하여 크기를 설정
	if (size.x == 0.0f && size.y == 0.0f)
	{
		size.x = text.size() * curFormat->GetFontSize();
		size.y = curFormat->GetFontSize();
	}

	// 크기의 반을 계산하여 halfSize에 저장
	Float2 halfSize = { size.x * 0.5f, size.y * 0.5f };

	// Y 좌표를 윈도우 높이에서 빼서 좌표 공간을 조정
	pos.y = WIN_HEIGHT - pos.y;

	// D2D1_RECT_F 구조체를 사용하여 텍스트를 그릴 영역을 정의
	D2D1_RECT_F rectF;
	rectF.left = pos.x - halfSize.x;
	rectF.right = pos.x + halfSize.x;
	rectF.top = pos.y - halfSize.y;
	rectF.bottom = pos.y + halfSize.y;

	// ANSI 문자열을 wide 문자열로 변환
	wstring temp = ChangeWString(text);

	// 설정된 영역에 변환된 wide 문자열로 텍스트를 그림
	context->DrawTextW(temp.c_str(), temp.size(), curFormat, &rectF, curBrush);
}

wstring Font::ChangeWString(string value)
{
	// 필요한 버퍼의 길이 계산
	int nLen = MultiByteToWideChar(CP_ACP, 0, &value[0], value.size(), nullptr, 0);

	// wide 문자열을 저장할 wstring 생성
	wstring strUni(nLen + 1, 0);

	// ANSI 문자열을 wide 문자열로 변환
	int len = MultiByteToWideChar(CP_ACP, 0, value.c_str(), value.size(), &strUni[0], nLen);

	// Null 종료 문자 추가
	strUni[len] = 0;

	// 변환된 wide 문자열 반환
	return strUni;
}
문자열을 출력하기위한 함수들의 구현부이다.
Font부에서는 String을 받아서 설정한대로 출력해주는 기능을 가지고 있다.
그러나, Font는, DeviceContext를 따로 사용하기 때문에, Font를 쓰고나서 원래 DeviceContext를 밀어넣어서
3D출력옹 DC로 변경해주어야 할 필요가 있다.
그래서 정의된 출력부 외에 다른 출력부에서 사용시 출력이 안될 수 있다.
순서를 잘 지켜서 사용하자.
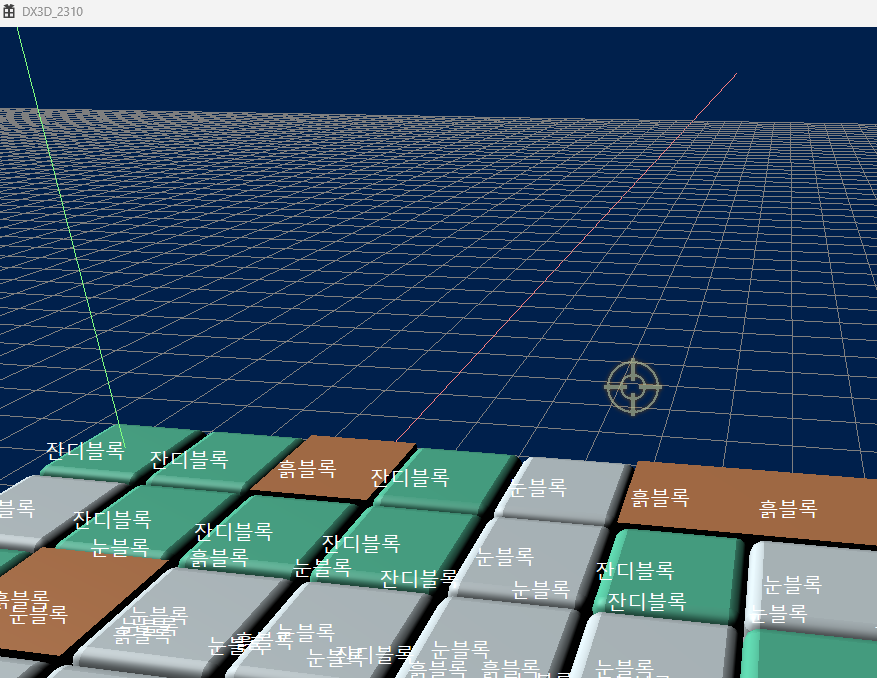
글자가 생성됨을 확인할 수 있다.
'컴퓨터 용어 정리' 카테고리의 다른 글
| 유한 상태 기계방법[ FSM(Finite State Machine) ] (0) | 2023.12.01 |
|---|---|
| DirectX Instancing (0) | 2023.11.28 |
| Frustum 기법 (0) | 2023.11.09 |
| DIrectx11 Dll Setting (0) | 2023.11.02 |
| 블렌딩(Blending)기술 (0) | 2023.10.30 |